




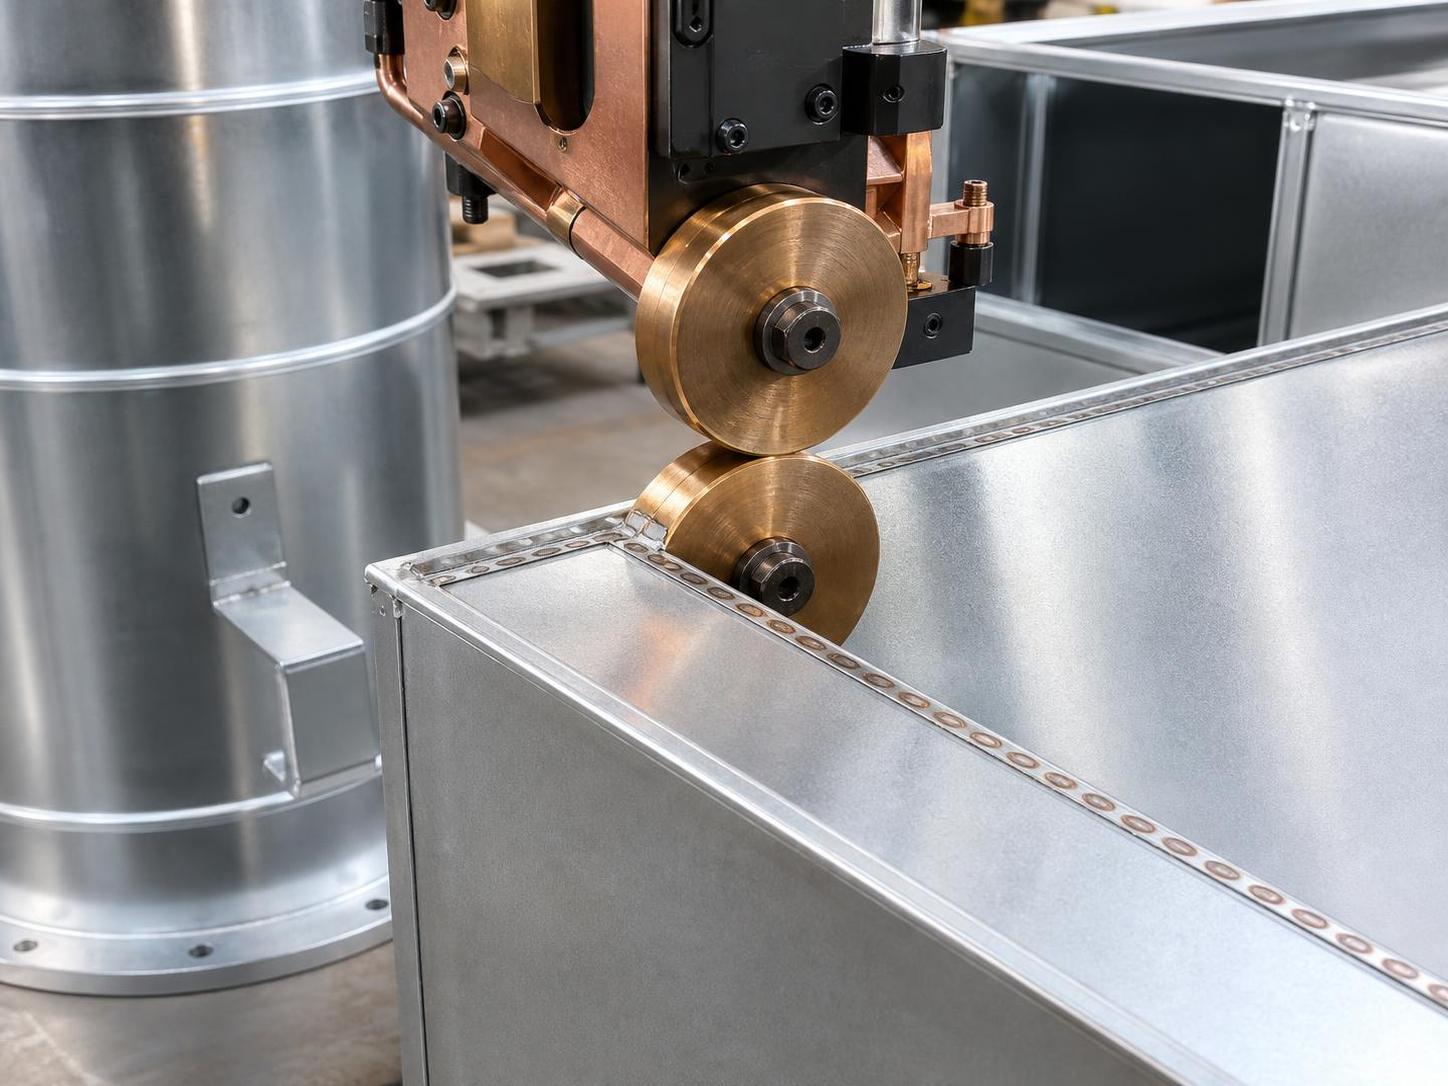
How Seam Welding Machines Work for Leak-Tight Joints in Tanks, Ducts, and Cabinets
For operators making tanks, duct sections, electrical cabinets, or other thin-sheet assemblies, the problem is usually not getting metal to join at all. The real problem is getting a long, continuous joint that does not seep air, moisture, or process media after forming, handling, and final inspection. Small gaps, inconsistent fusion, or visible burn marks can quickly turn a routine production task into repeated repairs and uncertain quality.
That is why seam welding machines are often chosen for leak-tight fabrication. They are built to create a continuous series of overlapping resistance welds under pressure, which is a better fit for sealed joints than widely spaced spot welds. If you are comparing processes or trying to understand why one setup produces stable seams while another leads to leaks and distortion, the key is to look closely at how current, force, speed, and fit-up work together.
Why leak-tight seams become difficult in real production
On paper, a straight joint on a tank shell or cabinet panel looks simple. In the shop, several variables make it harder. Material thickness may vary slightly between batches. Surface condition may change because of oil, mill scale, coatings, or handling marks. Edges may be formed well on one part and slightly uneven on the next. Once those parts reach the welding station, the machine is expected to keep a stable seam along the full path.
Common trouble starts when the joint line is mechanically acceptable but not electrically consistent. Resistance welding depends on contact conditions. If one area has higher resistance because of contamination or poor pressure, heat concentration changes. If another section has too little resistance, fusion can become weak. With products like ducts and cabinets, even a small discontinuity may not be obvious until air testing, water testing, or downstream assembly reveals the defect.
Another difficulty is that leak-tightness and appearance do not always fail in the same way. A seam may look continuous from the outside but still contain local voids or underfused areas. In other cases, operators try to eliminate leaks by increasing heat, only to create indentation, expulsion, warping, or electrode wear. Understanding how seam welding machines actually function helps separate these issues instead of correcting the wrong variable.
How seam welding machines create a sealed joint
Seam welding machines are a form of resistance welding equipment that use rotating wheel electrodes instead of the single-point electrodes found in spot welding. The workpieces are clamped between these copper alloy wheels, and electrical current passes through the overlap or butted seam zone while force is applied. As the wheels rotate, the machine forms a sequence of weld nuggets that overlap enough to behave like a continuous sealed seam.
In practical terms, the process depends on four linked actions. First, the wheel electrodes maintain contact and pressure. Second, the power source delivers controlled current for a set time or pulse pattern. Third, the workpiece moves relative to the electrodes at a defined travel speed. Fourth, the cooling and wheel condition keep the process stable over a long run. A leak-tight result only happens when these actions stay balanced.
There are two common operating modes. In continuous seam welding, current flows steadily while the wheels move, which is useful when materials and geometry allow stable heat input. In intermittent or pulse seam welding, current is switched on and off in rapid cycles while the wheels continue rotating. This gives more control over nugget spacing and heat accumulation, which is often helpful on thin materials or parts prone to distortion.
The sealing effect comes from nugget overlap. If the weld nuggets are too far apart, the seam behaves more like a row of spot welds and can leave leak paths between fusion points. If overlap is excessive because the speed is too low or heat is too high, the seam may overheat, mark the surface heavily, or distort the part. That is why seam welding machines are not judged only by rated power. Their real value is in repeatable control of force, current, timing, tracking, and cooling.
Where operators usually misread the problem
One common misunderstanding is to treat all leakage as a pure welding defect. Sometimes the seam itself is not the first cause. Joint design, part preparation, edge straightness, overlap width, or forming accuracy may already be outside a stable process window. In those cases, changing electrical settings alone gives mixed results because the machine is trying to compensate for a mechanical problem.
Another mistake is assuming more heat always means a tighter seal. Extra current can temporarily hide poor fit-up by forcing visible fusion, but it may also cause metal expulsion, thinning, and accelerated wheel wear. The seam may pass a quick visual check while becoming less consistent over a longer run. This is especially true on cabinets and duct components where long straight seams invite operators to increase speed or heat beyond what the wheel contact condition can support.
A third issue is ignoring upstream preparation. Many fabrication lines focus heavily on welding settings but give less attention to what happens before welding. If formed sections are not squared properly, or if mating faces are not prepared consistently, the seam welder inherits variation that it cannot fully correct. In structural and sheet metal workshops, this is why supporting equipment for edge preparation and face finishing can matter more than it first appears. For example, where beam or column components require accurate mating surfaces before later assembly steps, a machine such as CNC Face milling machine may be used in a separate operation to improve geometric consistency and reduce avoidable fit-up variation.
What to check before changing seam welding machine settings
Before adjusting the process, it helps to inspect the job in a fixed order. This prevents a lot of trial-and-error and makes it easier to identify whether the issue is electrical, mechanical, or material-related.
-
Check the joint design.
Confirm whether the product uses lap seam welding, mash seam welding, or another joint form suitable for sealing. The overlap should be consistent, and the edge condition should support stable contact through the full weld path.
-
Inspect material condition.
Look for oil, scale, coatings, oxide layers, and inconsistent surface cleanliness. Resistance welding is sensitive to contact resistance, so contamination often shows up as scattered defects rather than one obvious failure point.
-
Examine wheel electrodes.
Check wheel profile, alignment, wear, cooling condition, and contact surface quality. A worn or misaligned wheel can cause uneven pressure and unstable nugget formation even when the electrical program is unchanged.
-
Review force and tracking.
If the electrode force is too low, the seam may overheat or become irregular. If it is too high, contact conditions may change in a way that reduces proper heat generation. Tracking also matters. A wheel running off the intended seam line often creates leaks near edges or formed transitions.
-
Check speed against heat input.
Travel speed must match current and pulse schedule. If speed rises without corresponding adjustment, nugget overlap may drop below what is needed for a sealed seam.
-
Verify downstream testing method.
Sometimes the process is acceptable, but the acceptance method is not aligned with the product requirement. Air leakage, water retention, and appearance checks do not always reveal the same defect type. The inspection method should match the actual service condition of the part.
Practical steps to get more reliable leak-tight results
Once the basics are confirmed, the most effective approach is usually to stabilize the process in small steps instead of making large changes all at once. Seam welding machines respond best when the setup is tuned around a known material and joint condition.
-
Start with clean, repeatable fit-up.
Use a controlled preparation routine for cutting, forming, deburring, and fixture loading. If the parts enter the welding station with variable contact, process tuning becomes much less meaningful.
-
Set electrode force first.
Pressure determines contact behavior and influences heat generation. Establish a stable force range before chasing current values. This gives a more reliable base for the next adjustments.
-
Adjust current and pulse timing for overlap, not just appearance.
The goal is consistent nugget spacing and sufficient overlap to block leak paths. A seam that looks smoother is not automatically a better sealed seam. Evaluate both visual condition and functional testing.
-
Match speed to material thickness and geometry.
Long straight seams on thin sheets may tolerate higher productivity settings than corners, transitions, or formed edges. If one recipe is being used for all part shapes, that alone can explain inconsistent results.
-
Control heat buildup over the whole run.
Wheel cooling, duty cycle, and production rhythm all affect stability. A seam that starts well and deteriorates later often points to thermal accumulation or electrode condition rather than wrong initial settings.
-
Record the combinations that actually work.
Storing settings by material, thickness, and joint type reduces rework when production changes over. Shops handling multiple fabrication tasks often benefit from the same principle across different equipment. In machining operations, for example, some face milling systems store multiple parameter sets for fast job changeover, which is useful when processing H-beams, box columns, flanges, or similar structural workpieces. That kind of discipline in setup management translates well to welding too.
How to decide whether the issue is process capability or preparation quality
This is a useful distinction because not every leak problem should be solved at the welder. If a seam welding machine can repeatedly produce sound test pieces under controlled conditions, but defects appear only in mixed production, the process may be capable while incoming part variation is not. In that case, the correction belongs upstream.
Look at where failures occur. Random isolated defects along straight seams often suggest surface or contact inconsistency. Repeated defects at starts, stops, corners, or formed transitions point more toward timing, force response, or fixture support. Defects concentrated on certain part families may indicate design or preparation differences rather than a machine limitation.
For manufacturers working across welding and metal processing steps, this broader view matters. A rigid preparation chain often supports better sealing performance than repeated late-stage adjustments. That is one reason some workshops pay attention to machining quality in related operations. Equipment built with a rigid structure, programmable control, and stable geometric accuracy, such as a CNC Face milling machine with a maximum processing range of 2500mm × 2000mm, fits into that upstream logic when large beam or column faces need predictable preparation before fabrication or assembly. It does not replace welding control, but it can reduce variation entering later processes.
Good operating habits that reduce repeat leakage problems
Reliable sealing is rarely the result of one perfect setting. It usually comes from habits that keep the process window narrow. Keep wheel maintenance routine rather than reactive. Clean and inspect contact surfaces before the shift gets busy. Separate parameter sets by material and joint type instead of using a single general-purpose schedule. Make sample validation part of changeover when thickness, coating, or part shape changes.
It also helps to avoid treating welding, forming, and machining as isolated departments. Tanks, ducts, and cabinets are all sensitive to cumulative error. A small issue in cut quality, edge squareness, forming consistency, or fixture seating can show up later as a leak that looks like a welding defect. When teams review the full route instead of only the welding station, troubleshooting becomes faster and more accurate.
Frequently Asked Questions
Are seam welding machines always better than spot welding for sealed products?
Not always for every product, but they are generally more suitable when a continuous leak-tight joint is required. Spot welding creates separate weld points, while seam welding is intended to create overlapping nuggets that behave like a continuous seal.
Why does a seam look acceptable but still fail a leak test?
Visual appearance only shows part of the result. The seam may contain local gaps between nuggets, inconsistent fusion depth, or defects caused by contamination or unstable pressure. Functional testing is still necessary when sealing performance matters.
What is the first setting to review when leaks appear?
Start by checking fit-up, surface condition, and wheel electrode state before changing electrical settings. Many leak problems come from inconsistent contact conditions rather than an obviously wrong current value.
Can higher welding current fix poor overlap or part mismatch?
It may mask the issue temporarily, but it often creates new problems such as expulsion, heavy indentation, distortion, or faster wheel wear. It is usually better to correct fit-up and then tune the heat input properly.
Do upstream machines really affect seam welding quality?
Yes. Cutting, forming, deburring, and face preparation influence how consistently parts meet at the joint. Better preparation narrows variation and gives the welding process a better chance to stay stable.
Conclusion
Seam welding machines work well for tanks, ducts, and cabinets because they combine pressure, current, movement, and overlap into a process designed for continuous sealing. But leak-tight performance does not come from the machine alone. It depends on joint design, part preparation, wheel condition, parameter control, and realistic inspection. When those pieces are reviewed in order, troubleshooting becomes more straightforward, and the seam is far more likely to stay sealed in actual production.